Tuckpointing: How to Achieve a Good Color Match
By Mario Cantin
Much like the ability to create a perfect masonry wall, achieving the perfect mortar color match is an art. First of all, let me tell you that you will have to develop an eye for color, if you don't have one already. This is like anything else ? it can be learned.

The good news is that I've done much of the hard work for you already, so you won't have to sweat as much as I've had to! The bad news is that sometimes you will have to work harder than you'll want to produce a particular color.
There have been a few instances when I've had to work harder to produce a good color match. Like the time I had to make 13 separate sample batches to get the perfect match.
Or the time that I just couldn't get the color right on a Friday. I returned on Sunday and spent just about the entire day working it out. Again, I got it so good that it was truly invisible and the job was a masterpiece.
Through these experiences, I have determined certain guidelines to help me get the color right fast.
Half White ? Half Gray
When gauging a mortar with Portland cement for buildings built between 1890 and 1930, use half gray, half white Portland.
The time that I had to mix 13 batches, the predominant color was pink, but it was kind of purplish. So I played with pink pigment, and also brown, buff and black ones. I was getting close, it seemed, but it just wasn't turning out good enough to be called "invisible." No matter what I did, it just seemed to always be too gray or something. When that happened, I would switch to white Portland cement instead of using Ordinary Portland Cement (OPC), which is gray. But when I used the white Portland, then the color was too pale.
Then it suddenly dawned on me: I should use half white and half gray Portland cement when mixing the mortar. What do you know, it worked! The color fell right in to place.
So the first rule is: always put half gray and half white Portland cement in your mix.
For example, if you were making a Type "O" mortar, which would consist of nine cups of sand, two cups of lime and one cup of Portland, then that would be a 1/2-cup of white Portland cement and 1/2-cup of OPC (gray Portland). If you were making a Type "N" mortar, which would consist of six cups of sand, one cup of lime and one cup of Portland, then that would be a 1/2-cup of white Portland cement and 1/2-cup of gray Portland.
This is truly a secret, so don't tell your competitors about it if you want to stay ahead of the game.

Try to "Read" the Basic Colors
All colors are derived from the primary colors ? red, yellow and blue ? which are a group of colors that, when mixed together, will produce all other colors in the spectrum.
So when you look at the existing mortar, try to see whether you can identify a primary color that is influencing the overall color.
This is not complicated. The primary color you will usually run into is yellow, not red, as far as I've witnessed it ? and certainly not blue! So sometimes, you have to look to see whether yellow (we call it "buff" in masonry pigment terms) is in the color composition of the mortar color you are trying to reproduce.
I'll give you two examples. Sometimes, you'll have a mortar that is sort of blackish, but it just doesn't fall into place. You take a careful look at the old mortar on the wall, and you can clearly see the buff tone in it. So you start adding a lot of buff pigments to it and, all of a sudden, the color start to look better. In a case like that you may have to add a lot of buff ? a lot more that you would have originally thought ? to get the color right.
Another example is when you have a pinkish mortar that is almost "rust" in color. The pink tone comes from the fact that the old folks way back when added brick dust to the mortar, most likely to make it set faster; or maybe just to make it look more appealing. Now, you try with variations of pink and brown and even black pigments, but you can't get it right on. Again, you take a good hard look at the wall, and you can see the buff tone showing through the pink. This is what gives the mortar the rust coloration. You add a substantial amount of buff to your mix, in addition to the pink you already have in there, perhaps a small amount of brown, and it's now a perfect color match!
Use White Pigments to Correct the Color
Sometimes you'll find that the mix you have so far would work, except that it's a little bit too dark. Or, you've been having a hard time with a particular color and now you've got it, but you've made it way too dark. Well, in both cases, you can correct the situation by simply adding white pigments. You would normally add some and then mix it into the mortar, and then add some more as needed, and so on. Be sure to fully mix the white in before deciding to add some more, as white pigment can take a while to fully integrate into the mix and sometimes you can go overboard.
Consider the Sand Used
One time I ran into a mortar that was salmon in color.
First of all, I knew from experience that I should stick to the rule of half white, half gray Portland cement.
Another thing is that the sand is important in determining the color as it's the main ingredient by volume in the mortar. So I took a look at some disintegrating mortar on the house and saw that it contained a light-colored mortar, much lighter than I would normally use. I knew where to get similar sand.
I went to a home improvement store that carries washed, rounded beach sand for children's sandboxes. It is very light-colored and very similar to the sand on that house.
Then I used the sample case supplied by Interstar Pigments and Admixtures in Quebec, Canada, that contains actual pieces of mortar colored individually in every color they manufacture. By alternatively looking at the samples in the case and then at the mortar, I saw that the color of the mortar on the house fell somewhere between the "pink" sample and the "peach."
So I mixed my sample batch with the above mentioned ingredients. I almost immediately had a mix that was so perfect that you could not tell at all where the work had been done. Three contractors before me had tried to get the color, ranging from purple to light pink. I had to correct their work. The owners had no problem expressing that my work had surpassed any expectations they may have had.
Measure Quantities Accurately
No guesswork will do here. Use a container, rather than a shovel or spoon, to measure the Portland cement, lime putty and sand. This is referred to as measuring by volume, rather than by weight, and it is a very workable way of going about it, as long as you measure precisely.
For the pigments, use very small containers. Remember: It is even more important to measure pigments accurately as the quantities are much less by volume than the main mortar ingredients (Portland cement, lime and sand).
Again, be sure to use a measuring device shaped like a container, rather than a spoon.
Be Careful of Changes in Hue
Very often, the mortar color changes from location to location on the same building. You can often make a mix that will average out quite well and then you will require only one color for the whole job, or at least, for an entire wall.
Sometimes, though, there will be two or three colors on the house. There could be different reasons for this, such as different exposures to the elements, different parts of the house built at different times, etc. When the color is so different in hue, you need to mix a batch for each color. Otherwise you will find the average color will stand out and not give you a good looking color match with the surrounding mortar.
Always Document What You are Doing
Always have a pen and paper handy and be sure to write down what you put into the mix ? as you do it ? so you can reproduce it again.
On one particularly tough color matching job, I did just that. Because I had carefully written down what I had put into the mix, I was able to reproduce the color over and over for this building and didn't have to go through the agony of figuring out the color quantities again.
Keep Your Formulas on File
Now that you have documented how to create a color, you're going to file it away for future use. Doing this will save you a lot of time later ? take my word for it.
Everyone feels that, once they figure out a color blend, they'll never forget how to make it again; however, 10 or 15 jobs later, guess what... you run into the same color and now you don't remember how to create it again.
On every job that my company completes, the formula gets written down and put into a file for future reference.
And, generally speaking, there aren't that many colors. You will find, after the first 40 jobs that you know a lot of them already. But, you'll run into the odd one here and there.
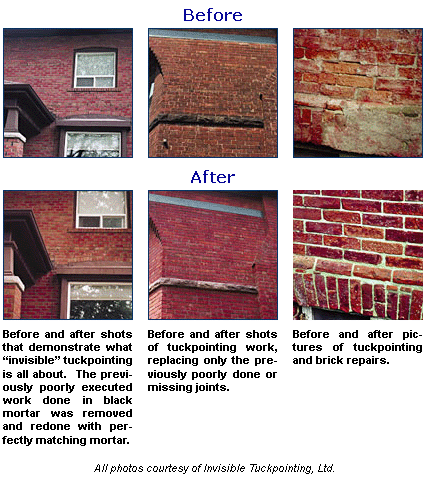
All of these tips are important. This is what "invisible" tuckpointing is all about. It's a skill you acquire, and it can be acquired quickly. The advantage of learning, selling and performing "invisible" repointing is that you can get more money for offering a service that no one else in your area can deliver. Essentially, it eliminates the competition.
The trick is to always be willing to take the time to figure it out when ? once in a while ? you run into a color that's harder for you to place.
I'm personally "addicted" to having customers in awe of my work. A customer telling me that our work looks "alright" is absolutely no good to me! The normal response I get is "Wow!"
What can I say? Good "invisible" tuckpointing is great for business!
About the Author
Mario Cantin, president of Invisible Tuckpointing Ltd., located in Ontario, Canada and Lewiston, N.Y., offers brick mortar replacement with a perfect color match and teaches others how to earn a six-figure income doing the same.


