Mortar and Grout: Fixing Grout Voids
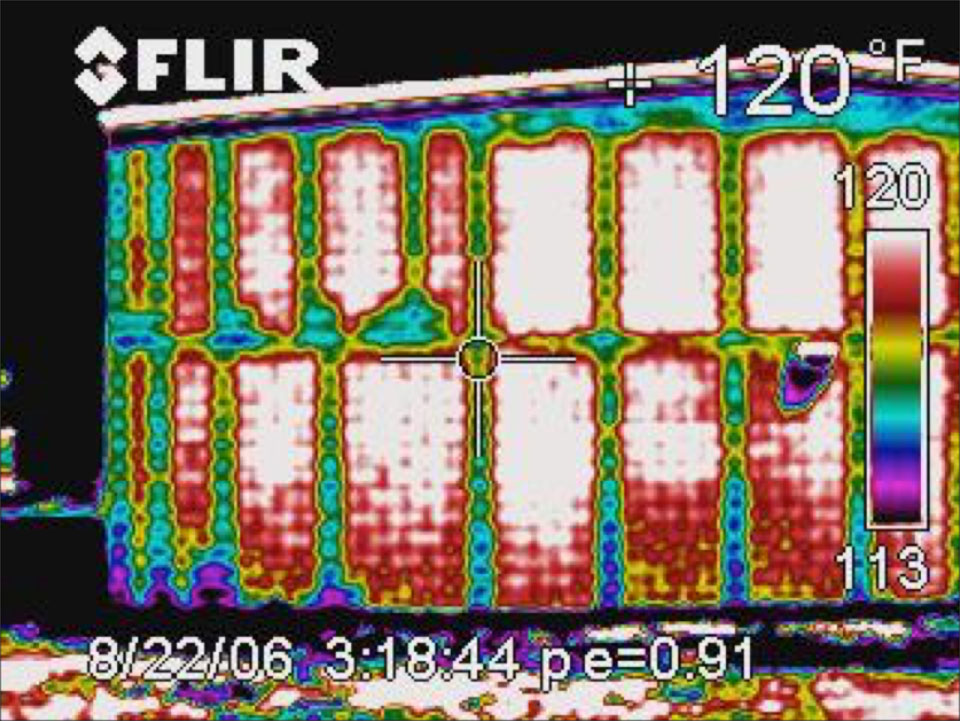
Infrared image of a west facing wall being heated by the afternoon sun. The grouted cells are 3-4° F cooler than the ungrouted cells. Note the full height grout void at the first floor and grout spillover in the bottom of the cell above.
So you thought you did everything right: the grout had proper slump, the bars were centered in the cells and with proper clearance to the face shells and cross webs, mortar fins were knocked off and cleaned out, the grout was initially consolidated with the vibrator and reconsolidated 5 minutes later and still the inspector found a number of grout voids. What now?
Well, it happens and probably more than we know. No one, with one notable exception, has x-ray vision. However, there are ways to re-grout a cell to meet project and building code requirements.
The first step is to identify all grout voids and quantify the extent of the void, i.e. where it starts and stops. This can be accomplished by sounding – hitting the reinforced cells with a small hammer and listening for the different sound a grouted cell makes versus an empty one. It helps to calibrate your ear frequently by tapping an adjacent, known empty cell. Sometimes it’s hard to tell the difference as the grout may have shrunk slightly in the cell. It is better to err on the conservative side and mark anything suspicious as a void.
Once you have sounded out all the suspect wall areas, it is time to verify your initial findings. The brute force method is to simply drill every bed joint in suspected voided areas noting whether the drill suddenly plunges into the cell (or not) once it is past the face shell mortar. It’s also a good idea to drill the occasional hole in cells that sounded solid as a double check. Another variation is to drill several suspect joints and look in the cell with a fiber optic videoscope – these are available at most big-box hardware stores. The videoscope can help determine the extent of the voids with fewer drilled holes.
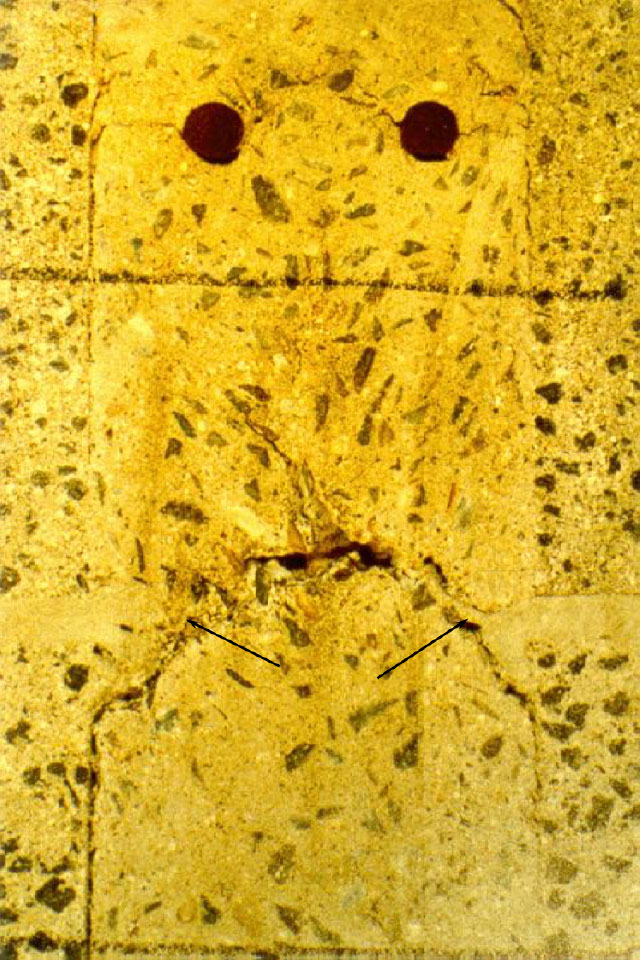
An almost void. Mortar fins and the bond beam reinforcing restricted the downward flow of grout and created a small arching void at the bed joint.
There are also higher-tech methods of finding grout voids if the conditions are right. If the building is enclosed and heated (or cooled) there may be a temperature difference in the grouted cells that infrared (IR) cameras can pick up. This is obviously much quicker and less invasive, but there needs to be a temperature difference across the wall causing heat to flow through the wall. There should be at least a 20° F difference from one side of the wall to the other but this also depends on the quality of the IR camera. If the building is not enclosed, the sun can sometimes be used as a heat source. Grouted cells will not heat up as fast when solar radiation first strikes the wall, so grouted cells will be cooler than ungrouted cells. Conversely, grouted cells will remain warmer than the surrounding masonry when solar radiation leaves the wall and the wall cools.
Filling the voids can be done by removing face shells every 4 ft. and at the top of the void and introducing grout using site-made troughs. Be sure to repoint any exploratory holes in the bed joints first and consolidate and reconsolidate the grout using a vibrator. Install new face shells at the top of each pour and let the mortar cure. The top course in the void can be dry packed with non-shrink grout and a new face shell reinstalled to complete the repair.
Alternately, specialized injection grouts or self-consolidating grouts can be used. Injection grouts can be placed through 3/8 inch diameter injection ports, drilled in the bed joints, using a pressure pot with 10-15 psi air pressure. Be sure to start at the bottom of the void and, when grout is present at the next course above, plug the bottom hole with a dowel and move up a course. At the top of the void, keep pressure on for a minimum of 4-5 minutes and then plug the top hole or use the dry pack grout and face shell method described above. Self-consolidating grout can be placed using a hole approximately 2 inches in diameter and patched with dry-pack grout at the top of the pour. The disadvantage with self-consolidating grouts is that these are not typically site mixed and minimum charges will apply for small quantities.
The final step is to repoint all the exploratory and injection holes.